4 Knots Every Sailor Should Know
Sailing and Knotsmanship go hand-in-hand together. Regardless of the size of the vessel, sailors rely on lines and knots to perform a variety of functions including everything from securing an anchor to hoisting a sail. Knots themselves come in a variety of shapes, sizes, and difficulties. There are, however, four knots that every sailor should know: The Square Knot, the Cleat Hitch, the Clove Hitch, and the Bowline. This blog will take a brief look at the history, the usage, and how to tie each of these useful knots.
Before diving into these four knots, there are some quick definitions to become familiar with.
- A rope is purchased as a rope, but once it is in use aboard it is called a line
- the standing part is the part of the rope that comes under load or strain
- the working end or free end is the part furthest from the part of the rope that is under load and is often the portion we use to tie knots
- a bight is the general name for an open curve in a line of rope
- a loop is a closed curve in a line of rope
SQUARE KNOT
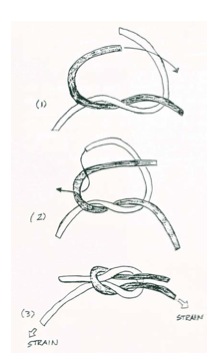
 Our first knot, the square knot also referred to as the reefing knot, dates back to at least 1794 and originates from its common use to reef sails or tie down and reduce the sail area in strong winds. The knot has two primary uses. Two ends of the same line can be tied to secure something, say to tie a deck brush down. Alternatively, the square knot can be used to tie two lines of similar thickness together to increase the overall length of the line. A unique characteristic of the knot is that it grips tighter when under strain, yet can easily be untied with one hand. I admit it is not always the most useful of knots aboard a boat, the square not is a great starting point for learning how to tie knots correctly.
To tie a Square Knot, first make a simple overhand knot (1), and note which of the ropes is uppermost (dark colored line). To Form the second overhand knot, lay the uppermost end (dark) over the other and pass the other through the eye formed (2). The finished knot should look symmetrical (3). Be careful not to tie a ‘granny knot’ which does not look symmetrical! Just remember ‘right over left, twist, left over right twist’.
CLEAT HITCH
 The second must know knot, is the cleat hitch. Evolving after the appearance of cleat, or secure “T’s” that can withstand a load and maintain tension on a line, there are two primary methods for securing a cleat hitch. We are going to discuss the locking cleat hitch here, commonly used to make-fast dock lines.
To cleat a line, first start with a turn around the base of the cleat. Done correctly, the first turn should begin on the near-side of the cleat and extend around the far end, opposite of the load. Bring the line over the front face of the cleat (1) below each horn in turn, in a figure-eight pattern (2), and back underneath the crossing turn as shown (3&4). It can take some practice to figure out the proper finishing twist, but a correct cleat hitch should look like a ‘bridge over two rivers’ and have at least 4 feet of excess working end.
CLOVE HITCH
 Our third knot, the clove hitch, is commonly used to secure a line to an object or horizontal fixture, is one of the most basic and essential knots there is. Especially useful because its adjustable, the clove hitch can be used aboard to secure fenders to life lines or bow and spring lines to pylons.
To tie a clove hitch, take a turn around the fitting to which you intend to secure the line. As the free end completes the first round turn, lead the line under the standing end (1) and make another round-turn, crossing over the first (2). The free end should be ed through the eye of the second turn (2). To check your progress at this point, make sure that the two ends point in opposite directions (3) Secure the hitch by pulling from both sides. Be careful not to make the free end too short, as it may slip under tension.
BOWLINE
 The final must know knot for all sailors is of course none other than the Bowline. Dating to the early age of sailing, on square-rigged ships, a bowline holds the edge of a square sail toward the bow of the ship and into the wind. Square rigged ships are taut-bowline when these lines are sheeted in to sail close-hauled to the wind. A simple knot, the bowline is used to form a fixed loop at the end of a rope. Used to secure mooring lines, halyards, and jib sheets, the bowline is advantageous to other knots because it gets tighter as the load increases. It should be noted, however, bowlines can come untied if not under a constant load.
To tie a bowline, form an eye toward the end of the rope, but far enough away to give you a loop the size you require (1). In the eye, the standing part should be underneath. Lead the free end underneath and through the eye (2). Then take a turn round the standing part and push the end back through the eye again (3). Tighten the knot by holding the standing part in one hand, the free end in the other and pulling (4)
When learning, this fun story about the rabbit might help you out. Imagine the end of the rope as a rabbit, and where the knot will begin on the standing part, a tree trunk. First a loop is made which represents the rabbits hole. The rabbit, or working end, then comes out of the hole, around the tree, then back down the hole.
Hope you enjoyed the first installment of our how-to tie knots series, look for more in the upcoming weeks. If there’s a specific knot that you want to learn how to tie, let me know and I’ll work it in sooner rather than later!