Sailing Knots: The Rolling Hitch

Spring has arrived to many parts of the country, and for those of you still snowed in, warm weather is only just around the corner. I don’t know about you, but when the weather starts warming up the first things I think of are 1) getting back in and on the water ASAP, and 2) setting up my hammock!
Whether you plan on getting out on a sailboat or lounging in the sun, there’s one knot that can help prepare you for either of these warm weather activities.
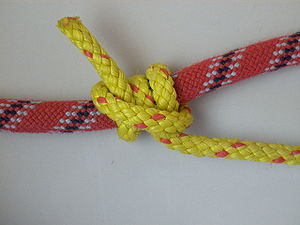
Introducing: The Rolling Hitch!
This knot is incredibly functional and easy to tie, making it one of my favorites. Rolling hitches are used in any situation when you need to attach a rope (or, if you’re on a boat, a “line”) to a pole, rod, or another piece of rope. Tension on the rope creates friction and prevents the rope from slipping. This only works in one direction though – If you tie it backwards, it will slip every time!
When you join a Sail Caribbean adventure camp you will find some excellent uses for this knot including: taking tension off of a sheet when you need to clear a jammed winch or block, taking tension off of a windlass when anchored, or attaching things (like a hammock!) to a stay (or tree, post, etc…). Excited yet? Here’s how you tie it.
How To Tie A Rolling Hitch:

Step 1: Use the working end to make a turn around the object. Bring the working end towards the direction of tension.
Step 2: Make another turn around the object. Feel free to add more wraps if you know there will be a heavy load on the rope and want to create more friction. The wraps (turns) should progress in the direction of tension (standing end).
Step 3: Make a half hitch, moving around the object in the same direction as the first turns. To make a half hitch, bring the working end above the first loop (furthest away from the standing end) and pull the working end between the object and itself.
Step 4: Tighten the hitch around the object before applying tension. Where the rope crosses itself, it should look like a bridge over two rivers running in opposite directions. If the knot slips, try adding more wraps to create more tension.
Happy knot tying!!!